
How to Create a Blogger Template From Scratch 2025

Blogger is a free blogging platform provided by Google. In Blogger, there is something called a template or theme. This template will be the appearance of your blog later. This template can also arrange the layout to make it look neater. You can create a Blogger template or use an existing one that is widely available on the internet.
Preparation
Before creating a Blogger template, you must have the following knowledge:
- HTML
- CSS (Basic)
- Javascript (Optional)
HTML is very important, and for CSS, you can use a CSS framework like Bootstrap. JavaScript is optional; if you want your display to be more interactive, you must also know JavaScript.
Introduction
I assume you already know the basics of HTML and CSS. If not, please learn them first. To create a Blogger template from scratch, you will follow several stages, while what I am discussing this time is still only the basics. Before editing the template, you need to know a few things.
Basic Knowledge of Blogger Tags
Before editing the template, you need to know the basic tags first. Here's what we will learn.
The style section is the CSS part that you will use to change the appearance of your blog page. The style section is written not with <style> /* CSS */ </style> but with <b:skin> /* CSS */ </b:skin>.
Section Part.
This Section part is where the Widget part will be placed. Here's an example:
<b:section id='main'></b:section>
Each section is only allowed to have 1 unique ID, meaning you cannot place 2 sections with the same ID. An incorrect example is as follows:
<b:section id='main'></b:section>
<b:section id='main'></b:section>
A correct example is as follows:
<b:section id='head'></b:section>
<b:section id='main'></b:section>
In the section part, you can apply several attributes with various functions as follows:
| Attribute | Type | Function |
|---|---|---|
id |
string | ID of the section, must be unique (required) |
max-widgets |
boolean | Maximum number of widgets to display |
class |
string | Class used |
cond |
string | To apply Blogger conditional tags |
locked |
boolean | Controls whether the section can add widgets or not |
tag |
string | Sets the tag name that will appear when rendering HTML |
name |
string | Section name that will appear in the layout |
Example of code implementation:
<b:section id='id-main' class='main' name='Main Section' tag='main></b:section>
Will result in the following:
<main id="id-main" class="main" name="Main Section"></main>
Widget Part
This part will render important sections. The available types are the same as what you can find in Layout > Add a Gadget. Available types include Blog, AdSense, Attribution, BlogArchive, BloggerButton, BlogList, BlogSearch, ContactForm, FeaturedPost, Feed, FollowByEmail, Followers, Header, HTML, Image, Label, LinkList, Navbar, PageList, PopularPosts, etc. You can read the complete documentation at Blogger Code Gadget Introduction
In addition, there are also attributes like in the Section part.
| Attribute | Type | Function |
|---|---|---|
id |
string | As an identity, must be unique (required) |
type |
string | Type to be displayed (required) |
locked |
boolean | Controls whether the widget is locked or not |
title |
string | Widget title |
visible |
boolean | Controls whether the widget is displayed or hidden |
Writing it is slightly different from the section in the ID attribute. In the section part, we can freely determine the ID, but in the widget part, it is limited by the widget type. Example of implementation:
<b:widget id='Header1' type='Header'/>
<b:widget id='Header2' type='Header'/>
And the widget part must be nested within the section part. Example:
<b:section id='head'>
<b:widget id='Header1' type='Header'/>
</b:section>
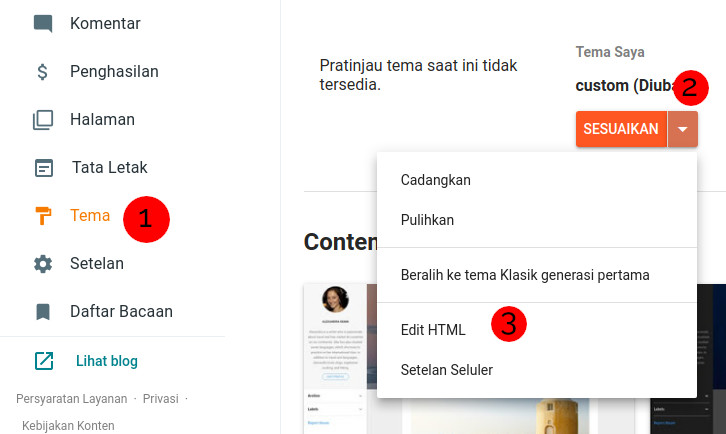
Editing the Template
Now go to Blogger and navigate to the Theme section, then click the down arrow and select Edit HTML.
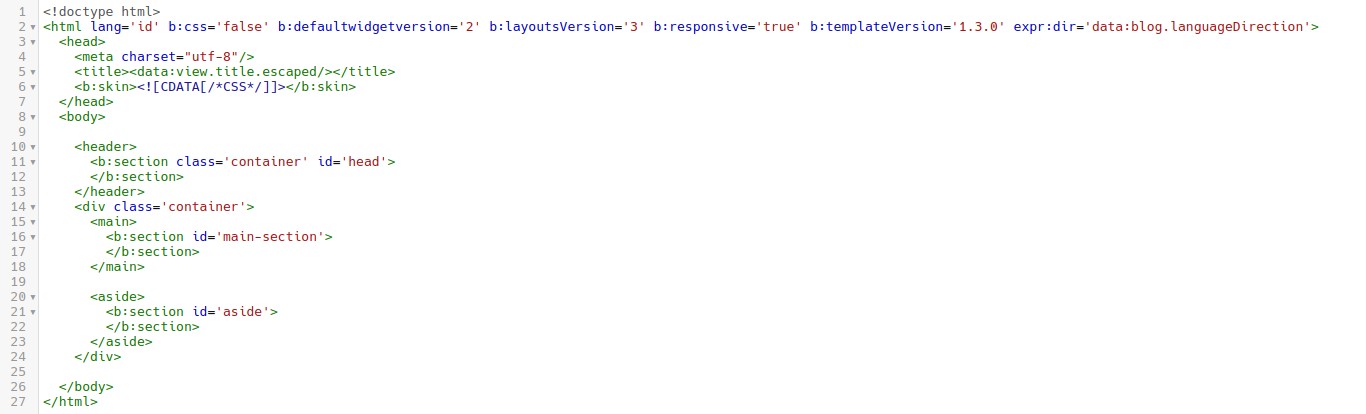
After entering the HTML edit section, you can now add your own HTML tags. Now add the HTML5 declaration along with its tags.
<!DOCTYPE html>
<html lang='id' b:css='false' b:defaultwidgetversion='2' b:layoutsVersion='3' b:responsive='true' b:templateVersion='1.3.0' expr:dir='data:blog.languageDirection'>
  <head>
    <meta charset="utf-8"/>
    <title><data:view.title.escaped/></title>
  </head>
  <body>

  </body>
</html>

The <data:view.title.escaped/> tag is part of the Blogger code that automatically displays the title. If you set your blog title to "Blogger Template," then your homepage will also be titled "Blogger Template." When you are on a post page, the title will change according to the post title.
Here, I set the widget and layout template to the latest version, revision 1.3.0, so some tutorials on the internet might not work.
You cannot save the template yet because the template has not applied any skin, section, or widget.
Now add the skin to the head section.
<b:skin version='1.3.0'><
Now add the header, main, and aside sections.
<header>
	<b:section class='container' id='head'>
	</b:section>
</header>
<div class='container'>
	<main>
		<b:section id='main-section'>
        </b:section>
    </main>

	<aside>
	  	<b:section id='aside'>
		</b:section>
	</aside>
</div>
Add widgets inside the section as follows:
<b:widget id='Header1' type='Header'/>

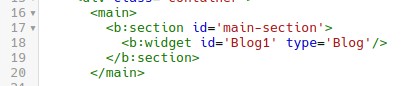
Also add the Blog widget to the main section.
<b:widget id='Blog1' type='Blog'/>
You can also add widgets to the aside section, and if you end the widget tag with />, the code will be automatically completed when you save the template. The final code for the template is as follows:
<!DOCTYPE html>
<html lang='id' b:css='false' b:defaultwidgetversion='2' b:layoutsVersion='3' b:responsive='true' b:templateVersion='1.3.0' expr:dir='data:blog.languageDirection'>
  <head>
    <meta charset="utf-8"/>
    <title><data:view.title.escaped/></title>
    <b:skin><![CDATA[/*CSS*/]]></b:skin>
  </head>
  <body>

    <header>
      <b:section class='container' id='head'>
        <b:widget id='Header1' type='Header'/>
      </b:section>
    </header>
    <div class='container'>
      <main>
        <b:section id='main-section'>
          <b:widget id='Blog1' type='Blog'/>
        </b:section>
      </main>

      <aside>
        <b:section id='aside'>
        </b:section>
      </aside>
    </div>

  </body>
</html>
Please save the template and reload the page to see the complete code. Now you can change it as you wish.
Final Words
Now you are ready to create your own template. Please experiment a lot because it can be quite confusing when understanding Blogger tags. For reference, you can visit Blogger Code. I apologize if there are any mistakes, as I am still learning.