

The Blogger API allows you to interact with the Blogger server to display, create, or delete posts and comments.
What is an API?
An API is an interaction tool that allows interaction between several devices, such as servers and clients. With an API, the backend and frontend can communicate with each other, such as displaying a post by retrieving it from a database or vice versa, creating a post by adding it to a database.
What is the Blogger API?
As I mentioned at the beginning and in some API definitions, an API can allow you to create or display posts and comments. I myself don't fully understand the function of an API itself, but regarding the Blogger API, you can definitely create related posts widgets, post lists by label, latest comments, next/previous by label, and so on.
Here's an example I made using the Blogger API V3.

Advantages of Blogger API V3
By using Blogger API V3, there are several advantages, including:
1. Better Structured Data
Blogger API V3 is better structured, not messy like URL feeds converted to JSON. Here's an example:

It's neater compared to URL feeds.
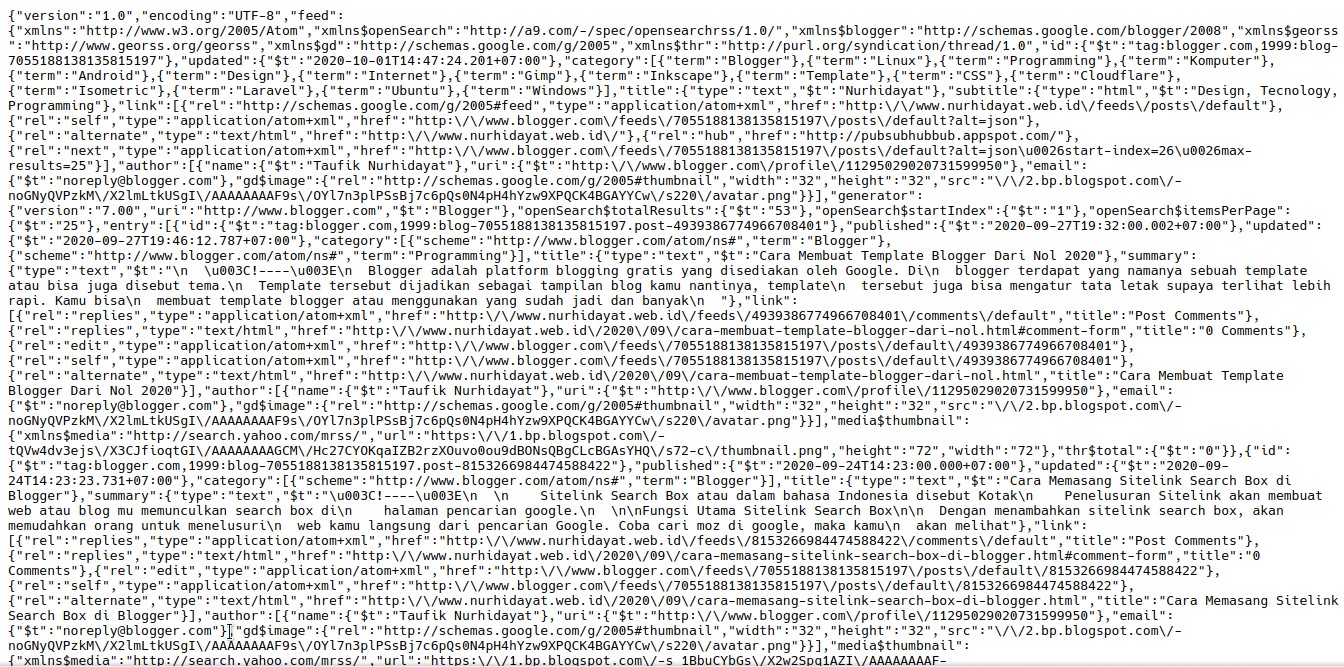
Even though it has been converted to be more readable, this URL feed is still not neat enough.
2. Easy to Customize
If URL feeds usually display post content as set from Blogger feeds, if we don't set it, the post content will be fully loaded, and this will affect the size of the URL feed. If you set the feeds content not to be displayed, it will affect the thumbnails not being displayed, whereas in Blogger API v3, you can choose to display or not display the post content, so the size is lower.
3. Supports Frameworks
By using AMP, you cannot add related posts scripts as usual, because AMP does not allow additional scripts. With Blogger API V3, you can create related post widgets with the help of amp-mustache and amp-list plugins, because Blogger API v3 is well structured.
Edited:
After I explored, it turns out AMP can also be called a JavaScript framework, so not only AMP is supported, but frameworks like Angular, React, and Vue can be integrated with this Blogger API v3.
Disadvantages of Blogger API V3
Of course, there are weaknesses in Blogger API V3, including:
1. More Complicated
Because in the Blogger API, you need an API key that is used to authenticate that the API is not being used by just anyone. For users who might want to install it quickly, it will feel annoying, but for me, this is not a problem.
2. Less Support for Blogspot URLs
It doesn't mean it doesn't support it, but it's more vulnerable if your blog doesn't have a custom domain. Because the API key must be set from the domain address of the blog you are using, if it's not set, anyone who knows the API key will be able to access it, and if someone is mischievous, your blog might end up with all your posts copied and nothing left, meaning all your posts are deleted.
Update: To delete and update a post requires OAUTH 2.0, so it's safe if someone accesses your API, your posts won't disappear.
The problem is you can't apply URLs like /[example.blogspot.com/] you have to use example.blogspot.com which can cause the API to be accessed from the URL 2example.blogspot.com whereas if you use a custom domain we can set it with .example.com/* so others cannot create subdomains with our own domain so it is safe to use.
How to Call API
There are various ways to call an API, depending on the language used.
Supported URL formats are:
https://www.googleapis.com/blogger/v3/users/userId
https://www.googleapis.com/blogger/v3/users/self
https://www.googleapis.com/blogger/v3/users/userId/blogs
https://www.googleapis.com/blogger/v3/users/self/blogs
https://www.googleapis.com/blogger/v3/blogs/blogId
https://www.googleapis.com/blogger/v3/blogs/byurl
https://www.googleapis.com/blogger/v3/blogs/blogId/posts
https://www.googleapis.com/blogger/v3/blogs/blogId/posts/bypath
https://www.googleapis.com/blogger/v3/blogs/blogId/posts/search
https://www.googleapis.com/blogger/v3/blogs/blogId/posts/postId
https://www.googleapis.com/blogger/v3/blogs/blogId/posts/postId/comments
https://www.googleapis.com/blogger/v3/blogs/blogId/posts/postId/comments/commentId
https://www.googleapis.com/blogger/v3/blogs/blogId/pages
https://www.googleapis.com/blogger/v3/blogs/blogId/pages/pageId
Example using Javascript.
<html>
  <head>
    <title>Blogger API Example</title>
  </head>
  <body>
    <div id="content"></div>
    <script>
      function handleResponse(response) {
        document.getElementById("content").innerHTML += "<h1>" + response.title + "</h1>" + response.content;
      }
    </script>
    <script
    src="https://www.googleapis.com/blogger/v3/blogs/blogId/posts/postId?callback=handleResponse&key=YOUR-API-KEY"></script>
  </body>
</html>
Or you can use fetch URL.
<head>
    <title>Blogger API Example</title>
  </head>
  <body>
    <div id="content"></div>
 	<script>
      const api_url = "https://www.googleapis.com/blogger/v3/blogs/blogId/posts?key=YOUR-API-KEY"
      async function getapi(url) {
          const response = await fetch(url);
          var data = await response.json();
          show(data);
      }
      getapi(api_url);
      function show(data) {
          let tab='';
          for (e of data.items){
          tab+=`<h1>${e.title}</h1>`
          }
          document.getElementById("content").innerHTML = tab;
      }
    </script>
  </body>
</html>
Whichever method you choose, but I prefer the second method, which is with fetch, so we can control whether the script will be executed or not by using an if condition. For tutorials such as how to get an API key and how to create a related posts widget and other tutorials will be posted another day when I am able to write.
List of Blogger API v3: